Charms update #2

Just a quick update on the various things I had been making. Its been quite busy for me, juggling crafting, work, school and theatre rehearsals. Sometimes I wish I have 72 hours!

I ran my first stall alone this time for my school and took it as an opportunity to get a feel of what it’s like to have a small pop-up. Loads to learn, I’ll say!

On to pictures of the clay I’ve been making!

image

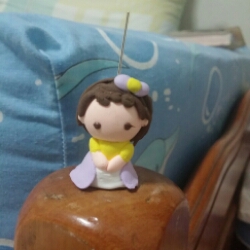
These are made out of air dry clay. They are less than the local 20-cent coin. I’ve yet to find a better comparison but to give you a rough idea, it’s around an inch tall.

image

I attempted to make another one after that, this time wearing a little dress made up of a bunch of flowers. It didn’t feel as delicate as the first one.

image

Oh well. Practise makes perfect! And I’ve been neglecting resin craft. Not good!

Charms storage

I recently have been making small charms out of Sophie and Toffee air dry clay. Because I am starting to accumulate a ridiculous amount of things at home, I had to think of some ways to store my finished, or half completed charms.

Enter Daiso where everything is $2 in Singapore.

This is, however, not the best way to store charms. I find it messy and a little bit disorganised, and I’m trying to find a more effective way to store all the finished clay charms.

YouTube has been very helpful but I haven’t got much time recently to get my things together since I’m pretty tied up with a performance recently (3 days rehearsal after work, and scripts down by end of July — which is today!!).

But I’ll be getting down to it once next week come and I have a little more time to breathe.

In other news, I’ll be opening my Etsy store on 9 August — Singapore’s National Day too! 🙂 I’ll update the pictures here, and also my instagram account closer to date!

Cheers and stay happy!

Microwave Polymer Clay?

For the past few weeks, I’ve been working on air dry clay. While I love working with air dry clay, I find the clay gradually hardening over the time I was working. While I like that it is non-baked, I do get somewhat irritated because sometimes the clay had reached a kind of ‘hardness’ that was difficult to work with. Also, Sophie and Toffee’s air dry clay tends to be a little on the spongey side, and I sometimes find that little indents and details don’t quite show up as well as I like (have you tried pressing into a sponge? It sort of bounces back after a while.)

Still, I quite love the air dry clay because it is extremely light and has a lovely texture. Then again, I cannot quite comment because so far I’ve only worked with Daiso soft clay and Japanese fuwa fuwa clay.

After work yesterday, I decided to get myself a sample set of sculpey polymer clay to play with. I had recently read that a toaster oven will bake sculpey. I do have a toaster oven at home, but it lacks a thermometer. In other words, the toaster oven at home will heat up very quickly, and will also have a case of “inconsistent temperature”, since I can’t control how hot the toaster can get. In any case, I decided to try it.

I got a ceramic tile from Art Friend, and popped the tile into the toaster first while I worked on a quick shape. After that, in goes the clay. I baked it for a while — 10 minutes or so. After the time is up, I thought to leave the clay in there a little, since I thought it was still soft.

Big mistake.

The clay went from blue, to brown within a minute.

In went the next piece of clay after the oven had cooled down. This time, I took the clay out when the timer went off, and let it cool. While waiting, I decided to pull up a quick search and learnt that clay is most brittle when they are hot from the oven. After that, it will rapidly cool and harden.

Ok. Lesson learnt.

Then my cousin suggested that I could use microwave and water. Honestly, that was pretty new — I haven’t actually heard of that, but I thought why not? So I made a bead with some of the scrap clay and popped that into a tall container with water before putting that into them into the microwave on ‘high’ for 5 minutes. Throughout the entire time, I kept an eye on the water level, and when the time was out, I drained out the water. Bead was hard. That is pretty good news.

I would have continued my experiment but it was pretty late by then. So, I guess that is going to be on my to do list this week — to try clay and microwave (with water of course!). I haven’t, however, heard of many people doing this — since there is this huge clay void on this topic (most searches tell me NOT to microwave polymer clay) so if anyone knows the science of it, I’ll be glad to know! 🙂

Air dry clay figures!

So I decided to jump on the clay wagon after playing with the clay treats. Bought myself 11 colours to start with and made two figures.

image

The first one was supposed to be my cousin… and it turned into something else. I wasn’t so good with hair though and made a mess at the back.

The second one is of a mermaid. Ariel, to be more precise.

image

It was ok until I started putting the parts together. And then Ariel became a monstrous fat lady in tail. Hahaha. It was fun, nonetheless.

Sweet treats

Ever since I discovered the world of resin and crafting, I also found myself immersing into the world of clay.

As a child, I have never enjoyed clay because I never knew how to handle clay correctly. As a result, I always ended up with clay pieces that just broke off. Very discouraging. Recently, I decided to give clay another chance and threw myself fully into it by buying a basic kit.

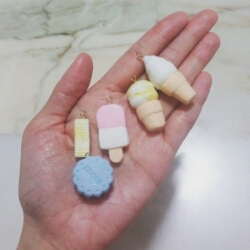
The kit came with 4 colours and two molds. I have only used one, and I’m really enjoying myself right now. So after a bit of playing around, these are my first charms from the kit:

image

They aren’t perfect but it was exciting to see them coming out of the mold. I was really tempted to make more. Then I thought, how about a macaron?

So I mixed up my favourite mint colour and got this:

image

Ok, so it wasn’t perfect. The shell was too thick and they weren’t even. But I felt a sense of achievement. So I tried another one which turned out much better. After two hours of play, these were my results:

image

I feel pretty darn proud of myself! I’ll probably keep myself busy with these projects over the next few days when I lack the motivation to sew!

Paw prints!

A couple of weeks back, I bought myself a silicone mold with paw prints. I decided to try making a pair of resin pieces with the mold as I wanted to try layers, and see how I can add more dimensions to the work I’m creating. The results? — two very pretty paw prints! The surfaces are quite matte, however.

I’m going to leave it instead of doming it, because I feel that the effect would otherwise be taken away. They are not quite finished yet, however. I still have to sand the bottom, and dome it, before making them into pendants.

These will be the first items to go on sale in my shop very soon.

Cheers!~

Gengar, I choose you!

I made this gengar for my boyfriend.

Apparently, gengar is one of his favourite character, even though he always claims that he’s too manly for cute things like this.

To create the background for this resin piece, I decided to try dry watercolour technique about 5 hours after the first layer of resin was poured in. However, I think I still haven’t quite gotten the effect that I wanted, so I’ll probably try this technique again in my next few pieces.

I also made 3 other pokemon resin pieces. Pictures when I finish doming the surfaces. Cheers!

A little bunny says hi

I drafted a simple pattern of a rabbit several weeks back, and left it. I never got down to sewing the rabbit because I had so many other things distracting me. After much procrastination, I finally got down to sewing the rabbit. Since this was my first time drafting a pattern from scratch with no reference, my measurements were somewhat off.

I traced the template out onto a piece of felt I had lying around, and began cutting away. A good half hour later, I had the rabbit laid out. Or rather the different parts laid out. I took a pretty long time with the cutting and trimming because, as usual, I was distracted by the boyfriend, the cat running around downstairs, and my brothers running in and out of the room.

Also, I was trying to trim the shape right. I never knew how to cut properly in a straight line. I supposed it’s my personality to some degree because I tend to be careless.

After cutting and trimming, I had to figure out what I wanted to stuff the rabbit with. I still had a lot of leftover cotton from my previous projects, but I was reluctant to use it. I felt that cotton tend to flatten over time, and plushies ended up shapeless. Hence, I decided that cotton wasn’t a good stuffing medium for this. Since I still had a lot of quilt batting left, I decided to use those in place of cotton stuffing. I spent the next hour tracing and cutting out the batting, deciding that I should use the “sandwich” method for sewing. That should, technically, result in a more even looking rabbit.

Another hour sewing, and then finally this:

I’m pretty proud of this creation. However, as you can see from the picture, the sewing are still very messy at certain parts. But stitching this has helped me figured out some things, and I’ll probably be doing a second rabbit tomorrow evening or something.

I also decided to skip the arms and legs for the rabbit. My boyfriend said it was pure laziness on my part but I told him the addition makes the rabbit looks very odd since I had cut the fabric a little smaller than I had calculated.

The rabbit is also quite floppy at the moment, so I’ll probably need to stuff it even more. I’m thinking of a rounder bottom… so it’s back to the drawing board for rabbit #2.

What do you think?

We don’t have to listen.

I didn’t think that I would end up crafting.

To be honest, my whole childhood and the early years were pretty… boring. I was always told by adults around me that crafting was a waste of time, and that I should pursue more bookish pursuits. And being the child I was, I listened. And did everything I could to make the adults happy.

Sometime growing up, I began to find myself interested in the performing arts. I started doing theatre performances, while pursuing an undergraduate studies in education. Of course, we had to pick our majors while in school so theatre it was. That was the beginning of a beautiful relationship with my creative self. I felt alive. Something had broken free.

I never looked back.

Some time this year, I was approached by my school to create an original performance for a school event. This would be my second year doing it. As usual, there is very little school budget for us to work with. With almost zero budget and a pretty ambitious dream, I would have to DIY a lot of things.

It was during the DIY process that I discovered something else… that sewing was something I enjoyed and there was so much joy in seeing the beautiful transformation of a piece of craft material into something I envisioned. I was hooked. From sewing, I discovered other crafting hobbies — resin was one of them. A part of me really wish I had found this love earlier. At 30, picking up a new hobby and trying to juggle my time is pure madness. Work, part-time studies, work, family… it was certainly hard to dedicate time to everything. But I see crafting processes and products the same way I se my theatre processes and performances — that each moment is a gift, and that it must be preserved and shared.

I’m really grateful for my boyfriend, who encourages me to craft and create — small whimsical things and little requests. He keeps me challenged, and constantly shows everyone around him my little creations. In a way, that spurs me on too… other than the fact that I need this hobby to keep myself sane amidst all the madness.

On a completely different note, I would never tell my child (if I ever have one) not to stop dreaming and believing. Dreams need to be fed; but more importantly, dreams need to be dreamt because they give us a freedom and pursuit away from just material gain and success.