Paw prints!

A couple of weeks back, I bought myself a silicone mold with paw prints. I decided to try making a pair of resin pieces with the mold as I wanted to try layers, and see how I can add more dimensions to the work I’m creating. The results? — two very pretty paw prints! The surfaces are quite matte, however.

I’m going to leave it instead of doming it, because I feel that the effect would otherwise be taken away. They are not quite finished yet, however. I still have to sand the bottom, and dome it, before making them into pendants.

These will be the first items to go on sale in my shop very soon.

Cheers!~

Gengar, I choose you!

I made this gengar for my boyfriend.

Apparently, gengar is one of his favourite character, even though he always claims that he’s too manly for cute things like this.

To create the background for this resin piece, I decided to try dry watercolour technique about 5 hours after the first layer of resin was poured in. However, I think I still haven’t quite gotten the effect that I wanted, so I’ll probably try this technique again in my next few pieces.

I also made 3 other pokemon resin pieces. Pictures when I finish doming the surfaces. Cheers!

Resin pieces and etsy store

These came out, perfect and better than what I had imagine.

image

I’m mad please with them and I think they are a great improvement from my first ones. However, I made the mistake of making these too thick. I think it’s the glitter and confetti spam. I should ease that up a bit. Generally, all the pieces are perfect; I just need to dome the front and back, and I’ll be done.

In other news, I will be opening my etsy store soon (url coming up in the coming posts since I haven’t listed anything yet). I’m looking to officially launch the store by mid-August 2015, but I’ll probably start selling my pieces earlier (kind of like a soft launch). There are still loads to do: description writing for each listing, the individual photography of each piece plus picture editing.

And then there’s the shoot.

My friend Deborah has very kindly agreed to help me model the accessories (the girl has already reserved and bought several pieces; I also gift her some in exchange for her time since I can’t afford to pay her). We are currently working on some ideas, and I’ll put up the sketches soon!

I’m really excited how this will turn out, and I can’t wait! In the meantime, I’ll be taking some closeups of the resin pieces. Until then!

Sealing papers

I’ve been wanting to embellish paper in my resin pieces. I think paper is generally a very versatile material to work with, and the possibilities that one can create within a resin piece with paper are endless.

The only problem is paper generally don’t hold up in a wet environment. Putting paper in resin and waiting for the resin to cure… I can imagine what might happen to the paper. So I had to find a way to seal it.

Previously a friend suggested hair spray. I went and read up a little, and the opinions were mixed. I bought a little bottle of decoupage from Daiso, and while it does the job, it was watery and I had to apply several layers. The drying time between each layer is between 30 minutes to an hour. Considering that I need to work fast (juggling work, studies, crafting, and several projects simultaneously is no joke), I needed another alternative.

So, I discovered mod podge at the local craft store. I had seen it the first time when my dad took me there to pick up some craft items. We were talking about its uses but it never occur to me that this would work well until I saw this video, and I thought, “Hey, why not?”

Back to the craft store it was.

Unfortunately, ART FRIEND RAN OUT OF MOD PODGE. RIGHT WHEN I NEED IT.

Just my luck.

So after much waiting, new stocks arrived. I went down once more, and ALL THE JUMBO MEGA SIZE JARS ARE OUT. Are you kidding me?!?! They have sample pots, and small bottles of other versions of mod podge like matte, crackling etc. And somewhere hidden from view, I found a small bottle of mod podge. 118ml (or 4 fl oz). Grabbed it.

Along the way, I also took a brush, thinking I was very clever (who doesn’t like clean hands?). Went home to seal a cutout background for a new resin piece I’ll be making.

image

It dries clear (yay), and as you can see, the brush has left wonderful streak marks on my paper (brush story coming up). Now, after I was done with this, I set this out to dry, and it took about 15 minutes to dry completely. Quarter the time I took previously. Which is great. I also like that mod podge is less watery as compared to the decoupage I got previously, which means less layers.

But what’s pissing me off was the brush.

It sheds. It sheds like crazy. Streak marks, I can deal because it dries clear anyway. But having brush hair SEALED IN WITH MY PAPER… kill me already. So in the end, I had to improvise and use a piece of cosmetic sponge to do the work.

And one more lesson from using mod podge: newspapers are your best friend. Don’t be an idiot like me and get dried mod podge EVERYWHERE on my workspace. Good thing the surface I was working on was a glass surface so the damage was minimal. But my parents certainly weren’t pleased.

My current resin pieces

I finally popped the last few resins out — and they were perfect.

I was pretty pleased with how they look, and I’m planning to turn the pieces into brooches and pendants 🙂

My boyfriend really loves some of them and demanded that I make him a couple as well — less girly, of course. Some of the other girls who saw the resin pieces suggested that I add additional things to them, such as charms and ruffles and bows. I attempted and let’s just say it wasn’t what I expected.

I’ll probably start on a new batch of resin pieces tomorrow. As for the bottom piece with the coffee head, I definitely am disappointed with the outcome. The sticker embedded inside curled up because it got wet. Really should have sealed it before, but oh well. Lesson learnt.

First resin pieces

Hello, I’m back with an update of my resin pieces. I had de-mold them this afternoon, just to see how they look. Unfortunately, I supposed I should have waited a little longer since my dad told me the resin pieces were still not cured completely.

Since I was curing a few other pieces under a Tupperware box, I decided to put the two pieces there as well so that I will not touch them at least until tomorrow morning.

image

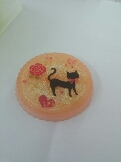
I called this piece “The Unimpressed Kitty”. It’s peachy in colour with a pearly pink based. Some of the pigments got onto the kitty’s face — ugh. But otherwise, I do like it a lot. I’ll probably make this into a ring.

The surface finish of this resin piece is dull because the silicone cup I used has a dull interior. Also, there is a circular bump right in the middle. In my excitement, I had forgotten to check — and apparently there is a little indent in the cup used. So I definitely need to dome the surface of this piece, in addition to the back.

image

Next, I’ve got this black kitty resin piece. Same colourway because the resin used were of the same batch and I was experimenting colours for the first time. I got some plastic bails and will attach one to this piece. I’m planning to gift this to my cousin in HK.

This turns out pretty ok and I’m pleased. The surface is perfect and shiny, and I’ll have to dome the back tomorrow morning.

Overall, these two pieces make me very happy. It didn’t feel as epic fail as my previous two. I’ve got another 3 more in the making — one of them feels like a potential fail as I painted the back of the resin with opaque pigments. Not sure how that’s going to work, but we will see.

All in all, this has been fun although I really hate waiting. But the good news is that I can use the wait time to finish up my sewing projects. Time, not wasted!

Lessons from the first

I tend to get very excited when it comes to trying new things, and when I get excited, I make mistakes and I end up becoming extremely impatient.

I recently attempted my first piece of resin work, and the results were disastrous. Basically, long story short, my first two pieces of resin looked like the cat pissed in them. They were messy, they were still tacky when bordering on the 72-hour time frame, and they are currently stuck to the bottom of the mold.

Yup, the epic fail piece of work, and a reminder of my folly.

There are definitely a lot of trial and error on my part, but largely boils down to my assumptions. So here are some lessons I learn.

Assumption 1: One cup for everything!

Basically, I decided to scrimp on the mixing cup and use one cup for everything. By that I mean, measuring out resin into measuring cup before measuring the hardener into the same measuring cup. Simple Math. Cool? And then after that, mixing. IN THE SAME CUP.

Apparently, nope.

See, the components are measured by volume. Using the same cup gives me more room for error. I could have easily overpoured one of the components and I would not be any wiser. Probably a reason why my resin pieces never got cured properly after so long.

Assumption 2: Stickers (puffy ones) go in immediately.

No. No. No. No. No.

That was the worst thing to do on my part. First, puffy stickers don’t stay. They go EVERY-FREAKING-WHERE except where I wanted them to. One lesson I learn here: the epoxy resin I purchased had a curing time of 24 hours. I have enough window to work, so there is no need for me to rush.

Assumption 3: SPAM CONFETTI AND GLITTER IMMEDIATELY.

Stupidest idea. Ever.

The confetti sank to the bottom, covered my work, and looked nothing like what I had imagined.

Assumption 4: All molds are equal.

Nope. Definitely no. I made a mistake with the mold. And I forgot mold release. You get the idea.

So these were the 4 assumptions I made when I was doing resin for the first time. It does feel a little miserable to know that I have to throw out a perfect good mold (with two cat-pissed-looking resin pieces that will never cure properly) inside, but a little price to pay for the lessons.

So here is a picture of what I am attempting today, bearing in mind all the assumptions, and also new knowledge and advice from the kind people everywhere.

I’m keeping my finger crossed — let’s hope the kitty comes out well!